
- Get your components
- Assemble energizer
- Set up energizer
Step 1 – Get your components
To build a solar energizer you need the following components:
- A DC energizer
- Marine Deep Cycle Battery 12 volt
- Solar panel
- Charge controller with the right wiring
- Ground rods
- Ground rod clamp
- 2 Jumper leads
- Storage container
About the materials
There are a couple things to keep in mind when you pick the components to build your own solar energizer. Let’s start with the main component that is the energizer, make sure the energizer is a DC energizer this means it is made to run of a battery or if the energizer has the dual power source option to set it up for battery feed.
The next important component is a Marine deep cycle battery, why a marine deep cycle battery? Because this means the cells are insolated which allows the battery to be moved around without shortening the lifespan of the battery. If you have a regular RV deep cycle battery the life span will be significantly shorter when you move it around (it is an option if you not intending to move your energizer around at all).
There is quite a bit of different options for solar panels, we will try to keep it a short as possible. We have as a rule of thumb for Southern Alberta 10 watts of solar panel per output joule. So, this means for example an 8-joule energizer needs at the minimum an 80-watt solar system to keep the battery full over night and a 12-joule energizer a 120-watt system. Now, most places that sell solar panels sell the charge controller and the wiring with the panel. A solar charge controller is used to keep the battery from overcharging by regulating the voltage and current coming from the solar panel to the battery.
For the ground rods is a rule of thumb to have a 6 ft ground rod per 3 output joules, so this means a 9-joule energizer needs 3 ground rods. There is a lot more to the grounding of an electric fence but this is a good rule to keep.
Jumper leads, I like to use jumper leads from the energizer to the fence and the ground rods. This gives the flexibility to move the energizer from pasture to pasture. The other option is for a more permanent set up is to use some high tensile wire or underground electric fence wire (this last option I like to do for eliminating and chances for shorts to the ground).
And than the last component is the storage container. To select the right storage container, you have to make sure it can fit the energizer, the batter, the charge controller and some wiring. It is also handy that it is strong enough to carry all these components (battery is heavy). And lastly make sure it is waterproof.
Step 2 – Assembly of the solar energizer
Step 1 Lay out all the components in the storage container and plan out how the wiring has to go.

Step 2 Drill the holes to mount the energizer to the container.
Step 3 mount the energizer
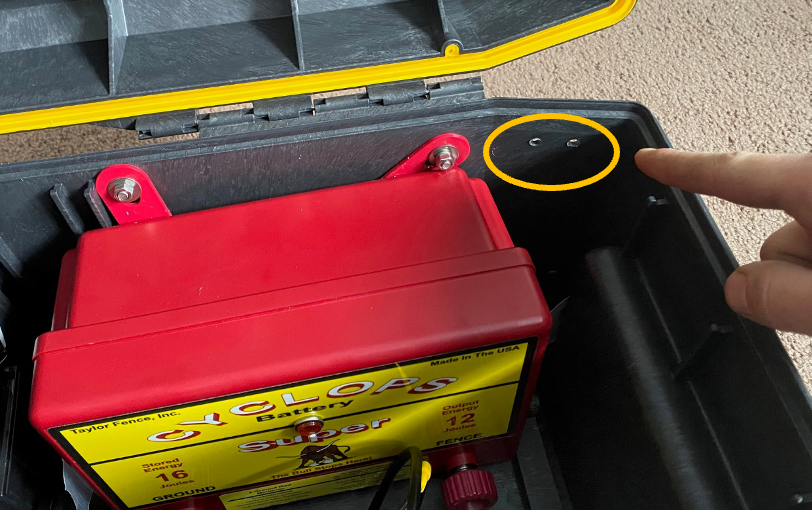
Step 4 drill 2 holes for the leads from the solar panel to the charge controller
Step 5 (optional) put some 2 sided tape under the battery to keep the battery in place
Step 6 install the wiring from the solar panel to the charge controller

Step 7 hook up the wiring to the charge controller (FOLLOW MANUFACTURES INSTRUCTIONS)

Step 8 mount the charge controller in the container

Step 9 hook up jumper leads to the terminal posts on the energizer

Step 10 make sure jumper leads don’t get pinched between the lid of the container (optional: make some groves so the jumper leads stay clear from the lid)
Step 11 hook up solar panel to charge controller if it comes with connectors

Step 12 hook up the power feed clamps to the battery posts (from this point the energizer should work and is LIVE!!)

Step 3 – Set up energizer


Here are some tips and instructions to set up the energizer. Hook up the ground lead to the ground rods. Hook the fence leads up to the fence. Now you should have power on the fence. You can check this with a fence tester and it should show anywhere between the 6-10Kv (6000-10000v). always make sure you hear the energizer ticking (sometimes they have a light that blinks by each pulse).
Make sure the animals cannot reach any of the wiring! And a personal tip is to put the container under the solar panel or under something to create some shade so the energizer and the battery are not in the direct sunlight, heat WILL affect the energizer and the lifespan of it. Another tip check regularly if the solar panel is working by checking the charge controller or with a multimeter, the voltage on the battery should be around the 12-12.6V.